MailerLite Review 2024: The Perfect Email Marketing Software For Beginners?
Welcome to our MailerLite review.
MailerLite is one of the best email marketing platforms on the market. It’s got a great free plan, affordable paid plans, and a solid feature set. But is it the right choice for your business?
In this post, we’ll help you figure that out by providing you with an in-depth, first-hand look at everything Podia has to offer.
We’ll cover all the platform’s key features and how to use them, reveal our take on its biggest pros and cons, explore pricing, and more.
By the time you’re finished reading, you’ll have all the information you need to make a final decision.
Ready? Let’s dive into it.
What is MailerLite?
MailerLite started out as a simple but powerful email marketing platform, designed to make it easier for businesses and marketers to plan and launch effective email campaigns.
And that’s still its core focus.
But over the last few years, the platform has evolved into an all-in-one digital marketing toolkit.
Now, you can’t just create newsletters with MailerLite, but also marketing automations, landing pages, reports, pop-ups, and even full-fledged websites.
All within one platform.
And with the recent launch of their new flexible infrastructure, they’ve laid the groundwork to add even more new features in the future.
This comprehensive feature set is all centered around the core email marketing software.
Everything else is seamlessly integrated so that you can create holistic marketing campaigns that generate leads, nurture them, and convert them to paying customers from one platform, without having to connect a bunch of third-party tools together.
What features does MailerLite offer?
MailerLite comes with a ton of features out of the box. These features are grouped into a handful of toolkits:
- Campaigns
- Subscribers
- Forms
- Sites
- Marketing automation
Next, we’ll take a closer look at each of these toolkits and give you a first-hand look at how they work.
We couldn’t possibly cover everything MailerLite has to offer in one post, so we’ll just focus on the most important features.
Note: Available features will depend on which plan you sign up for. See the pricing section of this review for a breakdown of what’s included in each plan.
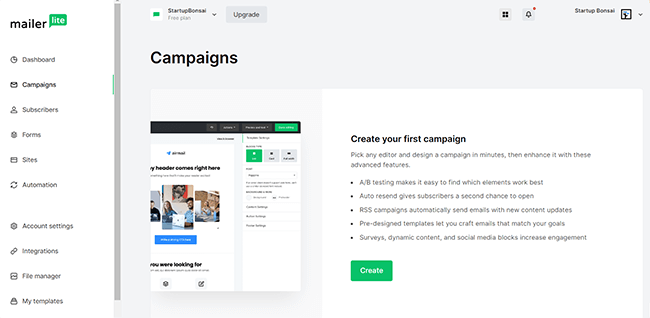
Campaign builder
MailerLite’s core feature is its campaign builder. You can use it to set up professional email marketing campaigns in minutes.
To get started, click Campaigns in the left-hand sidebar, and then hit Create.
There are four types of campaigns to choose from: regular campaigns, A/B split campaigns, RSS campaigns, and auto resends.
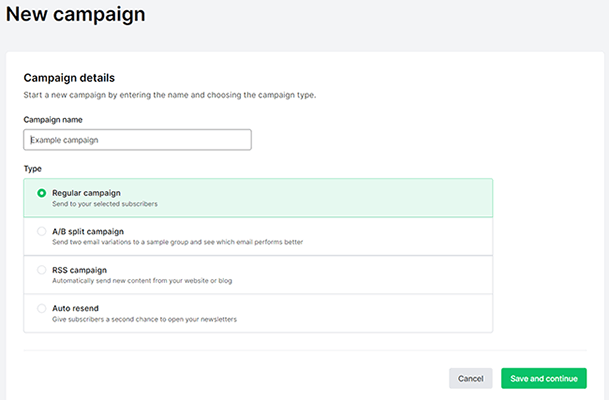
Each of these comes in useful, depending on what kind of campaign you’re trying to set up. But if you just want to create a straightforward newsletter, you’ll want to select Regular campaign.
After that, you’ll be prompted to choose a campaign name, select your sender email, and create your email subject line. You’ll also have the chance to set up your tracking options in this window, but we’ll talk more about that later.
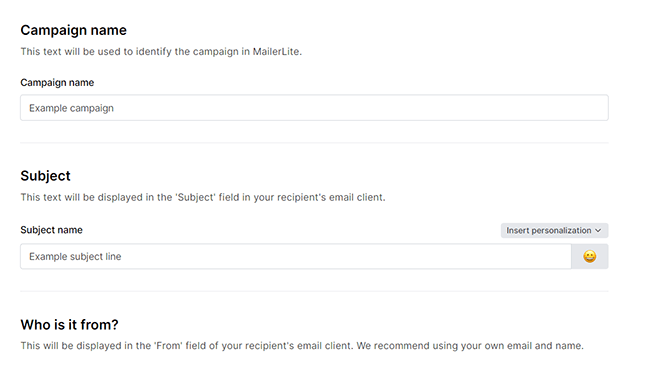
Next to the subject line input field, you can click the emoji icon to add emojis to your subject line. This is a nice touch, especially given that subject lines that feature emojis generate higher open rates.
Once you’ve done that, click Next, and it’s time to build your content.
And that brings us to our next key feature…
Email editor
MailerLite comes with not one, but three email editors that you can use to design your newsletters.
There’s a drag & drop editor, rich-text editor, and custom HTML editor.

The rich-text editor is useful if you prefer an old-school UI with inline editing and content blocks. And the custom HTML editor is useful if you know your way around code and want to write or import HTML to build your emails.
But in most cases, you’ll want to use the drag & drop editor. It offers more design flexibility and is a lot easier to work with. Here’s what it looks like:
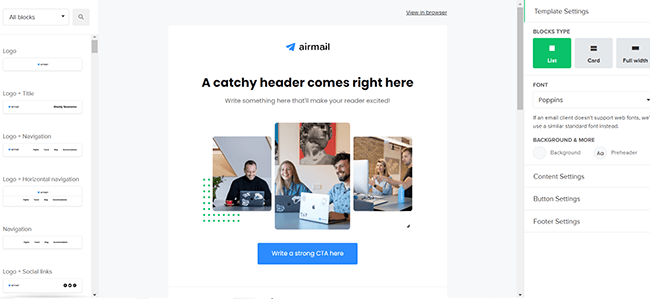
You can drag in content blocks from the left-hand sidebar, then rearrange them and customize them in the visual preview window.
There are pre-made blocks for all sorts of content. Aside from the usual blocks, like headers and images, there are also a bunch of more advanced blocks you can use to add interactivity to your emails.
For example, ecommerce blocks let you create shoppable emails that link up to your online product/checkout pages. And social sharing blocks let you link out to your social channels or embed posts from Facebook, Instagram, Twitter, etc.
There are also countdown blocks, webinar blocks, and blocks for videos, surveys, quizzes, etc.
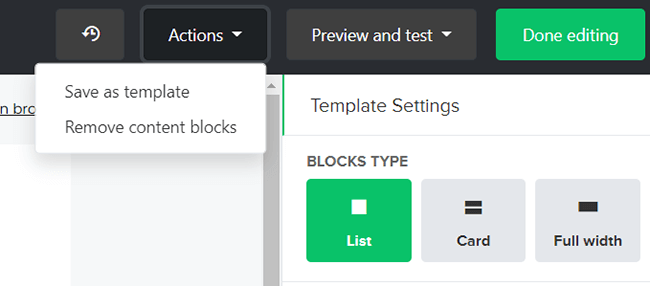
Once you’ve finished building your newsletter, you can preview it in your browser.
And you can click Actions > Save as template to save it to your template library so that you can use it again in future campaigns.
Templates
Rather than building each of your newsletters from scratch, you can start from a template instead.
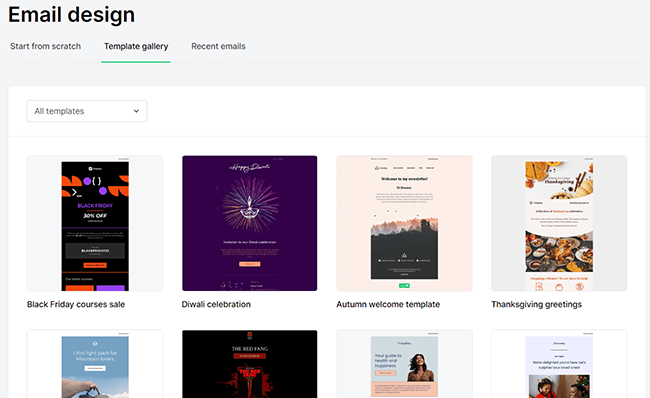
MailerLite has an extensive template library with dozens of professionally-designed, fully-customizable emails for every kind of campaign. There are templates for sales emails, holiday celebration emails, welcome sequences, product launches, events, and more. And as we mentioned earlier, you can also create and save your own templates.
Just find the template that most closely matches what you’re going for and click Choose to open it up in the drag-and-drop editor. Then, customize it and add your own content as needed. Easy!
My one gripe is that MailerLite’s UI makes it difficult to change templates once you’ve made a selection. You can’t go back to the template catalog from the editor, so you have to delete the campaign and start over again.
Not a huge deal, but it’s worth mentioning.
Email segmentation & personalization
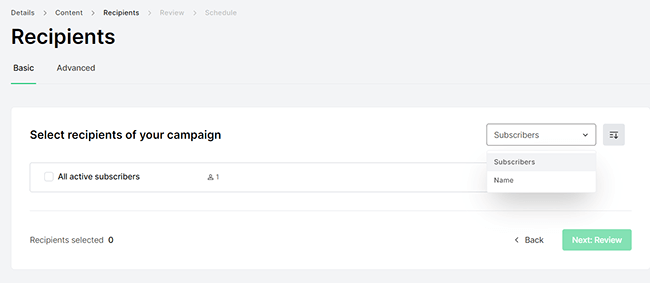
Once you’ve created your newsletter and clicked Done, you’ll be able to choose which recipients you want to send the newsletter to.
You can personalize your campaigns by sending them out to specific groups of subscribers, i.e. segments. We’ll talk more about how you can manage your list and create segments later.
From the Advanced tab, you can get even more sophisticated with your targeting via filters.
For example, let’s say you want to send personalized emails to subscriber groups based on their country.
First, you could create multiple versions of your newsletter. Then, you can choose the filter Location > Is > [Country] to set it up.
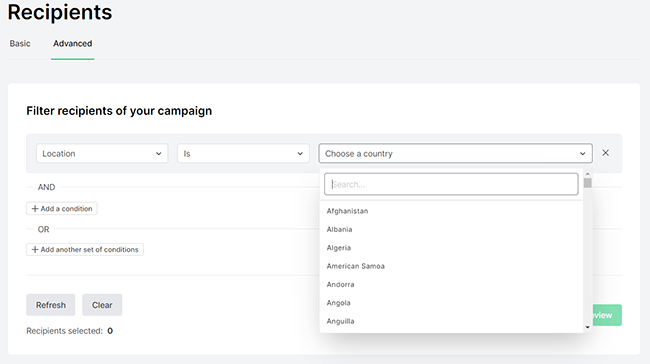
Or let’s say you want to send a re-engagement email out to subscribers that seem to be losing interest in your business.
In that case, you can choose to send it out to subscribers who haven’t opened or clicked any emails in the last [x] days using the Time inactive filter.
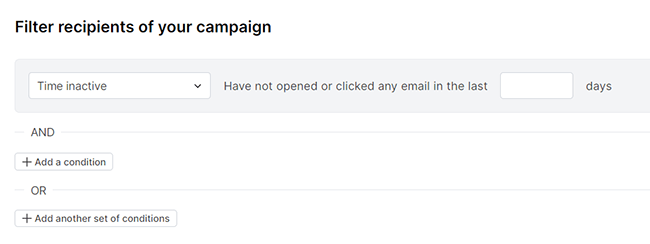
Those are just a couple of examples of how you might use filters, but there’s a lot more you can do. And if you’re working on a really elaborate/complex campaign, you can even use and/or statements to select multiple filter conditions in tandem.
Scheduling
The last step in finalizing your campaign is setting your scheduling options. You can choose to launch your campaign immediately or schedule it for later.
If you choose to schedule it for later, you’ll be able to choose the date and time you want to send it out in a given timezone.
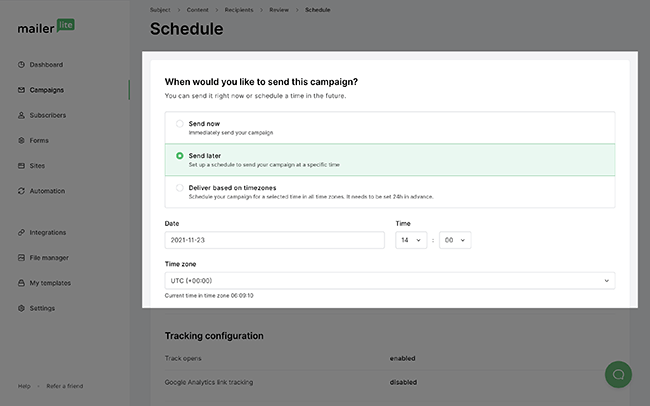
And if you select the Deliver based on timezones option, MailerLite will automatically send it out at the selected time across every time zone.
So regardless of where your recipients are based, they’ll all receive it in their inbox at the time they’re most likely to open and interact with it.
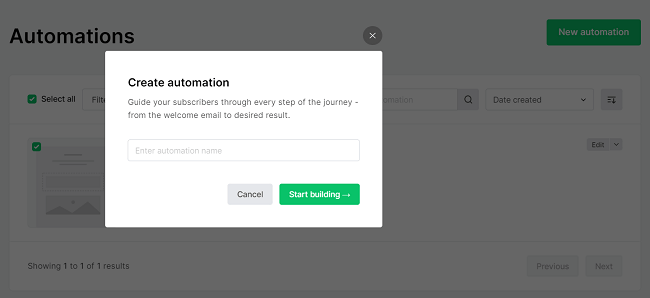
Automations
From your MailerLite dashboard, you can click Automation to set up workflows that automatically send emails or execute actions based on the actions of your subscribers.
This is a powerful tool that enables you to create sophisticated automated email sequences and drip campaigns to nurture prospects and guide customers through every step of their journey.
For example, you can use it to automate welcome emails, build lead nurturing email sequences, set up abandoned cart emails, and automate pretty much anything else you can think of. The possibilities are endless.
Click Create, name your automation, and select Start building to get started.
You’ll then be brought to the workflow UI. The layout is pretty typical for an automation builder with a traditional flow diagram format.
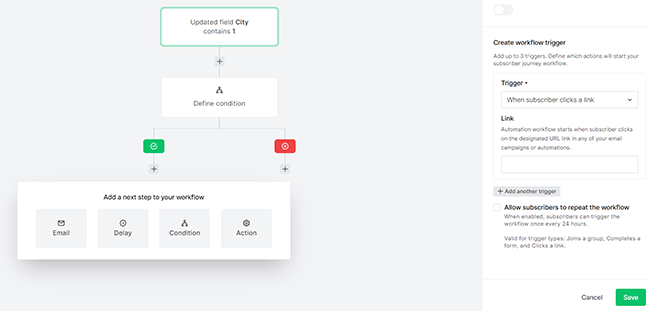
If this is your first time building automations, you’ll find that there’s a bit of a learning curve. But once you get the hang of it, it’s straightforward enough.
The basic idea is to arrange triggers, conditions, actions, delays, and emails in a flow chart and hit Save. MailerLite will then automate the process outlined in your flowchart for you.
Triggers are actions that kick off the automated workflow. For example, a trigger could be when a subscriber clicks a link or completes a form, when a certain date is reached, or when a field is updated.
Actions are the steps you want MailerLite to take when the trigger is met. For example, that might be to add or remove the subscriber to/from a certain group.
Alternatively, the next step after the trigger might just be to send out an email. For example, you can set it up so that when a subscriber fills out a form, they’re immediately sent a confirmation email or added to an email sequence.
Conditions are optional rules that enable you to create different paths in your automation. If the condition is met, a certain action will happen. And if it isn’t met, a different action will happen. This is sometimes called branching logic.
List management
From the Subscribers toolkit, you can manage the prospects in your mailing list.
Click the Segments tab to create custom audience segments, which you can then target individually in your campaigns.
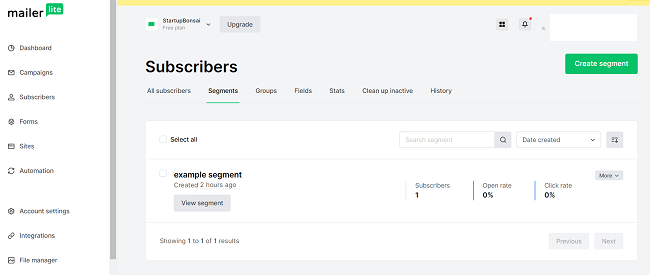
Likewise, you can create subscriber groups through the Groups tags. Groups are a lot like segments; you can use them to organize subscribers based on their interests and actions.
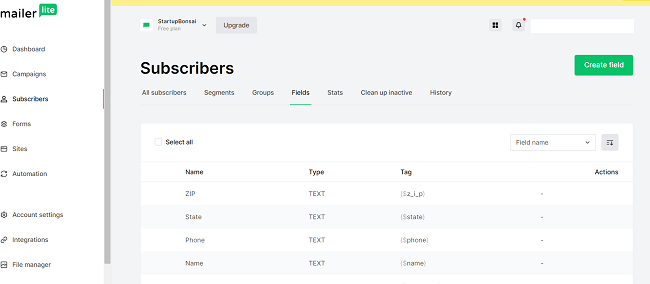
You can also create new data fields under the Fields tab.
If you click Add subscribers, you can import new subscribers manually, or through a CSV file, TXT file, or directly from MailChimp.
To help keep your list clean, MailerLite automatically cleans duplicates from your list. You can also clean up your list by removing inactive subscribers who haven’t interacted with your emails for a specified time period.
Forms and pop-ups
You can use MailerLite Forms to help grow your mailing list.
Navigate to the Forms tab from the left-hand sidebar and then click Create to get started.

Next, choose what type of form you want to create. There are several pop-up types to choose from including floating bars and side boxes. Plus, embeddable website signup forms and promotions.
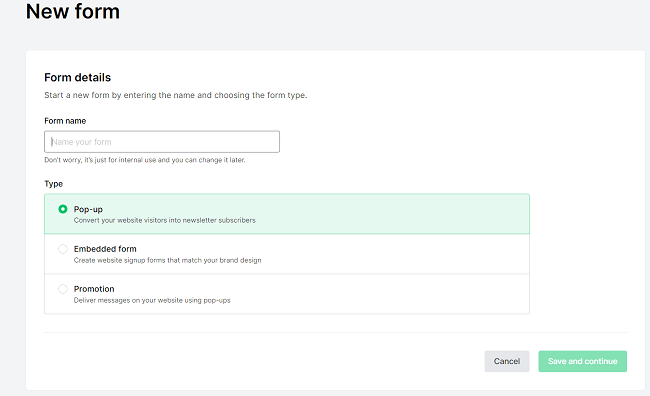
After that, you’ll be prompted to select a subscriber group to link to your form. Once you’ve done that, click Continue to start working on the design.
Depending on what type of form you’ve chosen, there will be a bunch of pre-made templates to choose from. Alternatively, you can start from scratch.
Once you’ve chosen a template, you’ll be brought to the form builder.
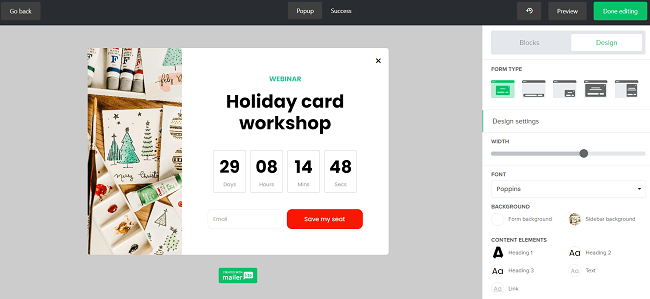
This is another WYSIWYG editor that’s pretty much identical to the drag-and-drop email editor. You can use it to edit your forms, add modules, change the content, customize the design and settings, etc.
Once you’ve finished editing, click Done.
If you choose to build a pop-up, you’ll then be prompted to set the behavior options.
You can choose who you want the pop-up to appear to, and when you want it to appear. For example, you could have it pop up after the user opens the page, when they scroll down to a certain section, or when they’re about to close the page.
And finally, you’ll be able to embed your form or pop-up on your website by copy-pasting a short Javascript snippet.
If your site is built on WordPress or Shopify, you can use a native MailerLite plugin to add your pop-ups instead.
Landing page builder
You can also use MailerLite to build landing pages.
Navigate to Sites > Landing pages > Create to get started.
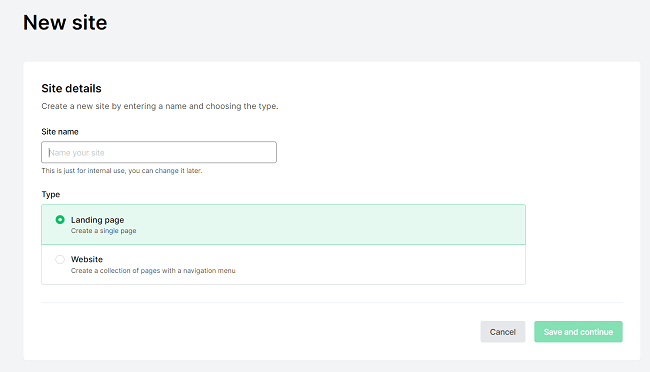
Again, there are a bunch of templates available for you to choose from for all sorts of pages.
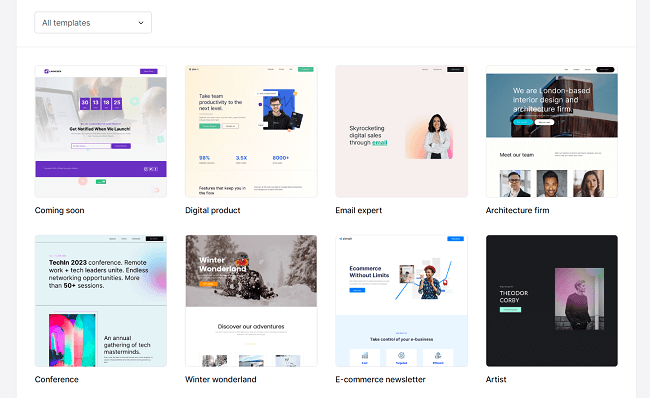
There are ‘coming soon’ landing page templates, ecommerce newsletter page templates, agency templates, webinar templates, and templates for a bunch of popular brand niches and industries (e.g. fashion, restaurant, etc.).
Choose a template or select Start from scratch to open up the landing page builder.
This is another WYSIWYG, drag-and-drop style editor that’s designed to be as easy to use as possible.
You can customize the layout and individual content elements, drag and drop blocks to rearrange the content on the page, add animations and interactive widgets, and a whole lot more.
It’s a great example of a visual page editor, but it isn’t perfect. The grid-based layout means you can’t move blocks around with complete precision—they’re locked into set positions. And in general, the editor feels a bit boxed in.
But for beginners who just want to set up high-converting landing pages with minimal fuss, and don’t need tons of flexibility and control, it’s perfect.
It is, however, worth mentioning that this is still an issue for some dedicated landing page software.
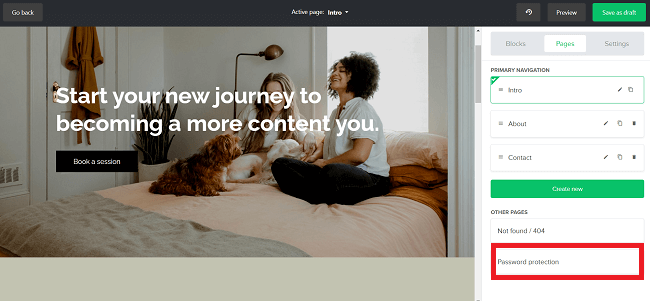
Website builder
Aside from landing pages, you can also build entire websites on MailerLite. Click Sites > Websites > Create to get started.
The website builder is pretty much the same as the landing page builder. But with some additional site-wide options. For example, you can add multiple pages and customize the navigation bar through the Pages tab.
And as with landing pages, you can start from a premade site template or build it all from scratch. One cool feature we liked about MailerLite’s website builder is the ability to publish password-protected content to your website.
But again, on the whole, it’s still pretty boxed in. It’ll work for very basic websites, but it’s no alternative to true website builders and content management systems like WordPress, Wix, Shopify, etc.
This is to be expected. MailerLite is, after all, primarily an email marketing platform. Additional features like this are a nice bonus, however.
Image editor
You’ll probably be using images in your email campaigns and landing pages, right?
Well, the good news is that MailerLite comes with a built-in image editing tool that lets you resize, crop, and edit your photos.
Here’s how to use it.
First, navigate to File manager from the left-hand sidebar. This is where you’ll store the images you use in your campaigns.
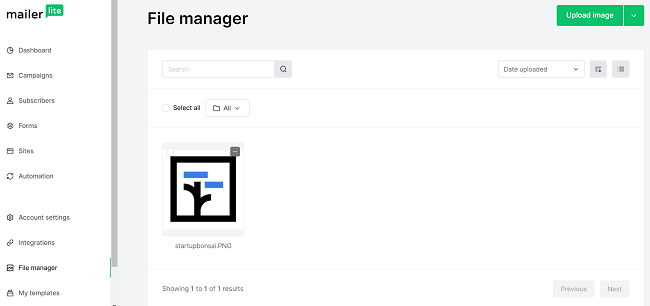
Click Upload images to add a photo to your catalog. Then, click the three dots in the top-right corner of the image and select Edit to open up the image editor.
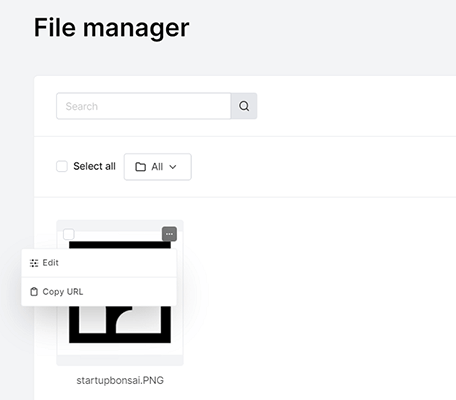
I was pleasantly surprised at how good the image editor was. It’s not exactly Adobe Illustrator, but it still offers some pretty advanced design tools.
There are a bunch of filters you can add to make your images pop. You can also adjust the levels and focus, plus add text, overlays, frames, and more.
Analytics
To help you track your campaign performance, MailerLite comes with powerful analytics capabilities.
From your Dashboard, you can see an overview of all the most important performance metrics, like the number of subscribes and unsubscribes over time.
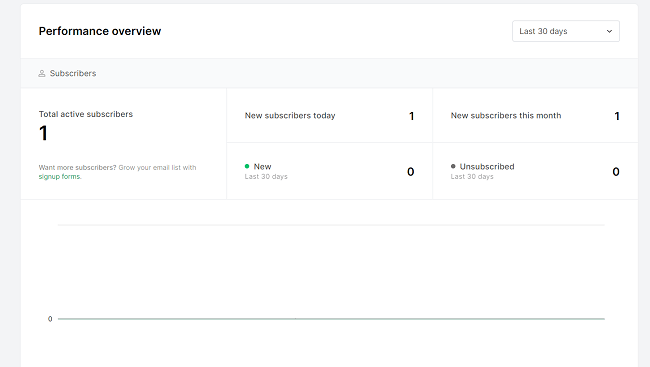
Below that, you’ll be able to see generic email metrics like opens, clicks, and click-to-open rates (CTOR).
MailerLite also tracks your automation workflows and lets you know how many subscribers are in the queue and how many have completed the workflow, as well as other relevant metrics from the same page.
Plus, you’ll be able to keep track of the average conversion rates of the websites and forms you build through the platform.
If you’d like to track newsletter traffic through web analytics platforms, click Enable UTM tags when setting up your campaigns to add parameters to the URLs.
You can also run A/B split campaigns to compare two email variants and track which one performs the best through the Campaigns tab.
If you want to really drill down into the data, you can navigate to Subscribers > Stats.
Here, you’ll be able to view detailed analytics for each of your subscriber segments and groups. That includes KPIs like average click rate and open rates, as well as overall engagement, reading environments, top domains, etc.
Integrations
You can view all of MailerLite’s natively supported integrations from the Integrations section.
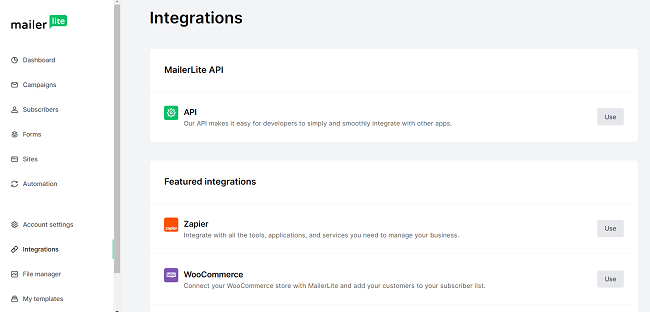
From here, you’ll be able to access the MailerLite API or connect the platform to your third-party tools.
Supported integrations include WooCommerce, WordPress, Facebook Audiences, MailerCheck, and Stripe.
Connecting MailerLite to these integrations can unlock additional functionality. For example, once you connect Stripe you can start selling digital products and subscriptions directly through your MailerLite landing pages.
It’s also worth noting that a lot of third-party integrations are available for MailerLite. For example, it’s a common integration to find in most lead generation tools (e.g. popover builders, giveaway apps, etc) and WordPress plugins like Elementor & Thrive Architect.
How much does MailerLite cost?
MailerLite uses a scalable pricing model. The amount you pay depends on the number of subscribers you have.
The prices we’ve listed below are for 500 subscribers, but you’ll pay more if your list is bigger.
There are three plans available: Growing Business (from $10/month), Advanced (from $20/month), and Enterprise (custom quote). Yearly discounts available.
The Free plan includes 12,000 monthly emails, supports 1 user and a max of 1,000 subscribers. It comes with all the key features: the drag-and-drop editor, email automation builder, website builder, forms and popups, and up to 10 landing pages. However, it’s only free for up to 1,000 subscribers. If you have more than that, you’ll have to pay for a paid plan.
The Growing Business plan is the entry-level plan and includes everything in the Free plan plus unlimited emails, 3 users, 24/7 email support, unlimited websites and blogs, dynamic emails, the ability to sell digital products, and more.
The Advanced Plan is the next step up and includes everything in Growing Business, plus Facebook integration, the HTML editor, the ability to add multiple triggers in automations, and more.
And finally, the Enterprise plan is there for businesses with over 100k subscribers. It includes everything you get in the Advanced plan plus a dedicated success manager, higher usage limits, custom landing page design, and custom newsletter design.
MailerLite pros and cons
MailerLite pros
- Great value for money. MailerLite is one of the most affordable email marketing service providers out there. And considering all the tools it comes with, you get a lot of bang for your buck. If you were to pay for your email marketing software, landing page builder, and form builder separately, it’d likely cost hundreds of dollars a month. But with MailerLite, you get it all out of the box—for a fraction of the cost.
- Ease of use. MailerLite is built for beginners. Anyone can learn to use it in no time with no prior knowledge or design/coding skills. The hardest part to learn is the automation builder, but even that is very beginner-friendly compared to competitor tools.
- Drag and drop email editor. The newsletter builder is one of MailerLite’s strongest selling points. It’s an excellent example of an email builder done right, with lots of blocks, extensive customization options, and stellar design tools
- Generous free plan. MailerLite’s free version is one of the most generous on the market. It gives you more than enough credits to try it out extensively, and you get access to all the main features straight away.
- Excellent email deliverability. Usually when these tools offer a free plan, it attracts spammers. But MailerLite runs a tight ship and verifies accounts. This, amongst other things, helps to maintain high delivery rates.
MailerLite cons
- Limited flexibility. The tradeoff for MailerLite’s ease of use is limited flexibility. In particular, the landing page and website builders feel very boxed in compared to dedicated platforms and CMS solutions.
- Customer support. MailerLite only offers email support to users on the Free and Growing Business plan. And the wait times could definitely be quicker. Overall though, it’s better than the support offered by some more expensive email marketing platforms.
MailerLite alternatives
Not convinced that MailerLite is the right fit for your business? Here are some alternatives you might want to check out instead.
- Drip | Our review — A cloud-based email marketing tool that’s geared towards ecommerce businesses. It stands out for its powerful automation capabilities.
- GetResponse | Our review — One of the oldest and most popular email marketing tools on the market. Now an all-in-one marketing platform that also includes additional features like conversion funnels, websites, webinars, and more.
- ActiveCampaign | Our review — A powerful customer experience automation platform that includes advanced email marketing and automation tools, plus an integrated CRM.
Final thoughts on MailerLite
That concludes our MailerLite review.
All in all, we can’t fault MailerLite when it comes to value for money.
It comes with a lot of powerful features, and the price tag is much more reasonable than many of its competitors.
Plus, you can sign up for a free account which is ideal for beginners that are just getting started with email marketing, don’t have a huge list, and aren’t ready to invest in a paid tool yet.
MailerLite’s Campaigns and Automation toolkits are still its standout features. In particular, we really liked the newsletter editor and the selection of templates on offer. And we found the workflow builder to be very advanced and flexible.
All the other bells and whistles—like the landing page/site editor and form/pop-up builder—are nice additional features that extend the functionality of the platform, but they’re nothing to shout about.
Dedicated tools will always provide deeper functionality, of course, but they’re nice to have bundled in, particularly if you’re just starting out.
Most importantly – email delivery is excellent. They verify new accounts and do a good job at keeping spammers off the platform. The same can’t be said for some other platforms.
We’d absolutely recommend MailerLite to beginners, and to anyone looking for a solid email marketing and automation solution that doesn’t cost an arm and a leg.
We hope you found this review useful. Thanks for reading!
Disclosure: If you buy through links on our site, we may make a commission. This helps to support the running of Startup Bonsai.