NitroPack Review 2024: An Easier Way To Speed Up Your Website?
Welcome to our NitroPack review.
NitroPack is one of our top recommendations for website performance. It promises to take the headache out of site speed optimization by doing everything for you, automatically.
But just how much does it really boost performance?
To find out, we put NitroPack to the test and compiled this in-depth review to share what we learned along the way.
Below, you’ll find a breakdown of our before and after speed tests, so you can see for yourself the kind of results you can expect with NitroPack.
Plus, you’ll also find a breakdown of all of the platform’s features, as well as its pros and cons, pricing, and everything else you need to know.
What is NitroPack?
NitroPack is a cloud-based, all-in-one website performance optimization solution that makes it easy to speed up your website.
The idea behind it is simple: It applies every single speed optimization to your website for you. Automatically. Without you having to write a single line of code.
Here’s why that’s so great.
Without NitroPack, you’d typically have to stitch together a bunch of different tools and plugins to handle different optimizations: a CDN, a caching plugin, a minification plugin, an image optimizer… and so on.
But the problem with that is that all of those plugins clog up your site. Plus, they’re not necessarily all designed to work together, so you can end up running into site-breaking conflicts.
NitroPack solves that problem. It can do the job of all those different tools from one platform. All you have to do is connect it to your site, choose your initial configuration options, and let it do its thing. It takes less than five minutes.
And the result? Significantly faster load times, and stronger user experience metrics (like the Core Web Vitals metrics).
We’ll take a closer look at everything NitroPack can do later when we get into the features. But first…
NitroPack speed test data (before/after)
Okay, let’s cut straight to the chase here.
The best way to review a website performance tool is to see how much it improves website performance, right?
So before I show you all of NitroPack’s features, we’re going to run some NitroPack tests and evaluate the data to see exactly how much of an impact it has on site speed.
Testing methodology
I wanted to make these tests as fair and realistic as I could.
So I started by creating a fresh new WordPress website, hosted on one of Bluehost’s shared hosting plans and running the Astra theme.
Then, I filled it out with some demo content by importing a bunch of dummy pages, posts, images, plugins, widgets, and menus through the Starter Template plugin. I made sure there were no other performance plugins activated on the test site other than NitroPack.
To run the tests, I used Google PageSpeed Insights and GTMetrix to compare performance benchmarks before and after running NitroPack. And I ran multiple tests with different NitroPack configurations to see how each configuration affected the results.
I’ll break down the results of each test below.
PageSpeed Insights
Let’s start by looking at the results from PageSpeed Insights.
Before NitroPack:
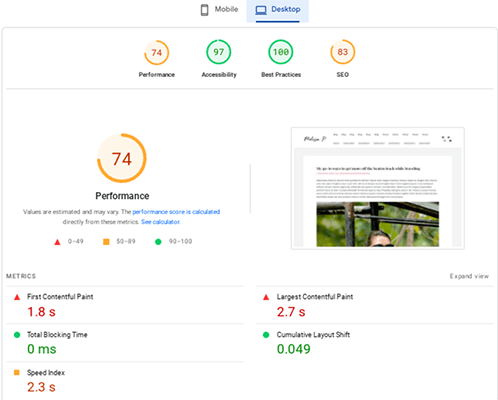
First, I ran a test without NitroPack to get a baseline of my site’s speed before performance optimizations. Here’s what PageSpeed came back with:
On mobile:

On desktop:
These benchmarks weren’t that bad to begin with, but there was definitely room for improvement. So let’s look at what happened when I installed NitroPack.
After NitroPack (Standard Mode)
I initially configured NitroPack to run in Standard Mode. This is the lowest level that you can run NitroPack in, and it only deploys the most lightweight, basic optimizations.
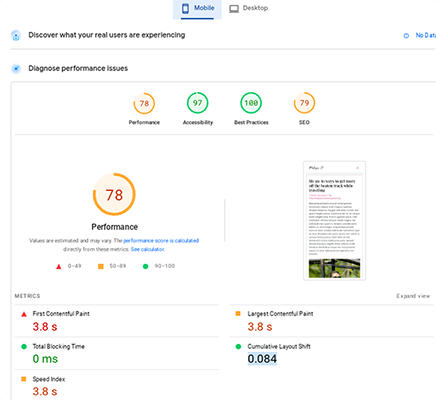
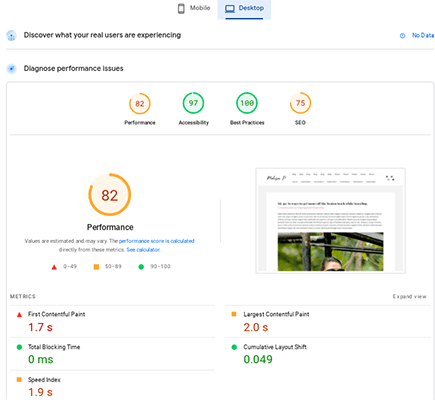
Then, I ran a PageSpeed test again. Here’s what the results looked like this time.
On mobile:
On desktop:
As you can see, there was a modest improvement in performance scores on both mobile and desktop (but especially so on desktop) when I ran NitroPack in Standard mode. But I still think we can do better, so let’s try again with some additional optimizations.
After NitroPack (Ludicrous Mode)
For the next test, I switched over to NitroPack’s Ludicrous Mode—the most aggressive setup, configured for maximum performance.
And I also tweaked some custom configuration settings to turn on additional optimizations that weren’t on by default, like ‘reduce unused css’ and ‘delay scripts’.
Here are the results from that test on PageSpeed Insights:
On mobile:
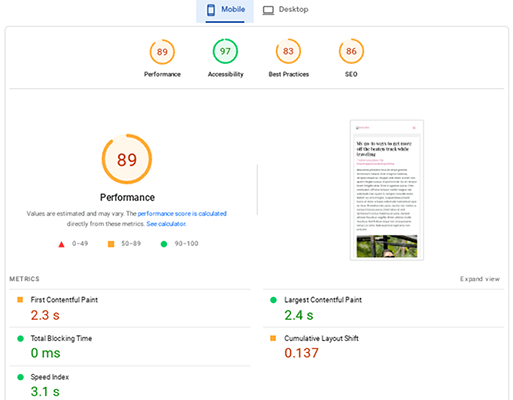
On desktop:
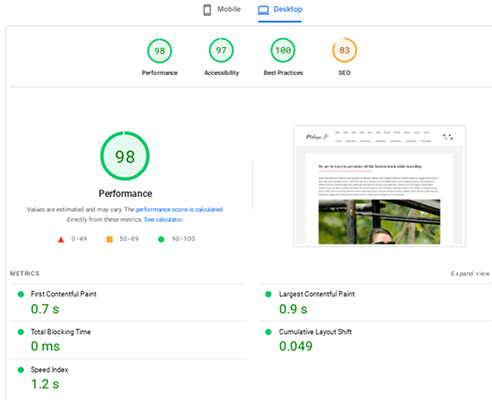
As you can see, performance really shot up in Ludicrous mode.
Results compared
Here’s a breakdown of the results from the PageSpeed tests in a side-by-side comparison table:
On mobile:
| Before NitroPack | After NitroPack (Standard mode) | After NitroPack (Ludicrous mode) | |
| Performance score | 73 | 78 | 89 |
| First Contentful Paint | 3.8 s | 3.8 s | 2.3 s |
| Largest Contentful Paint | 4.8 s | 3.8 s | 2.4 s |
| Cumulative Layout Shift | 0.028 | 0.084 | 0.137 |
| Speed Index | 4.2 s | 3.8 s | 3.1 s |
On desktop:
| Before NitroPack | After NitroPack (Standard mode) | After NitroPack (Ludicrous mode) | |
| Performance score | 74 | 82 | 98 |
| First Contentful Paint | 1.8 s | 1.7 s | 0.7 s |
| Largest Contentful Paint | 2.7 s | 2.0 s | 0.9 s |
| Cumulative Layout Shift | 0.049 | 0.049 | 0.049 |
| Speed Index | 2.3 s | 1.9 s | 1.2 s |
Overall, there was a significant improvement in all of the important PageSpeed performance metrics after running NitroPack, on both desktop and mobile.
Standard mode was enough to boost speeds by a decent amount, but after switching to Ludicrous mode and tweaking the configuration settings to apply additional optimizations, performance increased significantly across the board.
GTMetrix
Next, I repeated the same text using GTMetrix. GTMetrix lets you run tests from different server locations around the world. But for the sake of brevity, and to keep things consistent, all of these tests were run from a server in Vancouver, Canada.
Before NitroPack:
Here’s what GTMetrix came back with after testing the unoptimized website page on my test site before installing NitroPack:
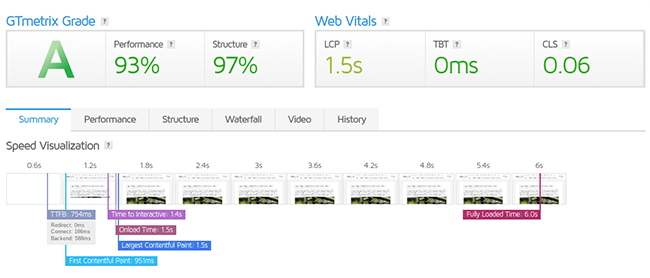
Again, these benchmarks weren’t too bad to begin with, but let’s see if NitroPack can make it even faster.
After NitroPack (Standard Mode)
Here are the GTMetrix results after activating NitroPack Standard mode and re-running the test:
As you can see, there were big improvements across the board.
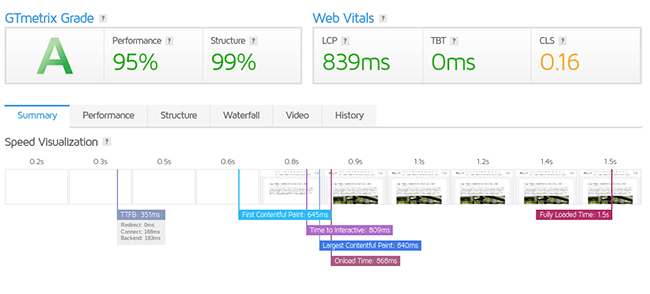
After NitroPack (Ludicrous mode)
Here are the results after running a GTMetrix test in Ludicrous mode:
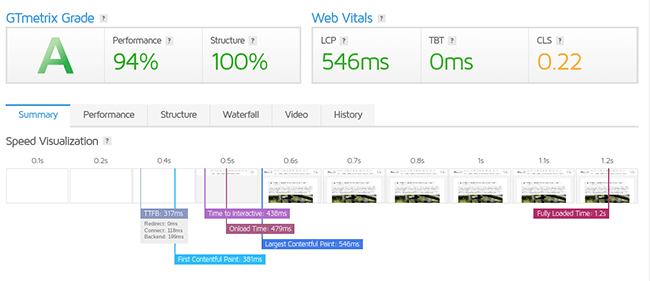
Oddly, the overall performance score actually dropped by one percentile when switching from Standard mode to Ludicrous mode.
But if we look past that metric for a moment, it’s clear the site speed improved: The most important speed metrics like TTI, TTFB, FCP, LCP, and fully loaded time were all significantly faster compared to the Standard mode test.
Results compared
And here are the results from GTMetrix for each test side-by-side.
| Before NitroPack | After NitroPack (Standard mode) | After NitroPack (Additional optimizations) | |
| Performance score | 93% | 95% | 94% |
| Structure score | 97% | 99% | 100% |
| Time to first byte (TTFB) | 754 ms | 351 ms | 317 ms |
| Time to interactive (TTI) 1.4 s | 1.4 s | 809 ms | 438 ms |
| First contentful paint (FCP) 951 ms | 951 ms | 645 ms | 381 ms |
| Largest contentful paint (LCP) 1.5 s | 1.5 s | 840 ms | 546 ms |
| Fully loaded time 6.0s | 6.0 s | 1.5 s | 1.2 s |
Once again, the results clearly show that NitroPack did indeed boost performance significantly.
Even on the Standard mode, NitroPack cut the time to first byte in half, and reduced the time to fully loaded from 6 seconds to just 1.5 seconds—that’s 4.5 seconds shaved off instantly.
And on Ludicrous mode, the results were even more impressive.
Undoubtedly, then, these tests seem to confirm that NitroPack does what it says on the tin and significantly improves your site’s page speed.
What features does NitroPack offer?
The main NitroPack features you need to know about are:
- Caching (smart invalidation, browser caching, automatic cache warmup)
- CDN (Global CDN, GZIP and Brotli compression, etc)
- CSS Optimization (CSS combining, above-the-fold critical CSS, deferred font loading, CSS minification, CSS compression)
- HTML optimization (HTML minification, HTML compression, advanced resource loader, DNS preconnects)
- JS optimization (Intelligent JS combining, JS minification, JS compression, deferred loading)
- Image optimization (preemptive image sizing, WEBP support, adaptive sizing, lazy loading, lossy and lossless compression)
NitroPack rolls out all of these optimization features automatically on your website as soon as you set it up. But you can change your configuration options to turn certain features off and on from your dashboard.
Next, let’s take a look at the UI to see how everything works.
Getting started
To use NitroPack, you’ll first need to sign up for an account and connect it to your website.
It integrates seamlessly with several website builders and ecommerce platforms including WordPress, WooCommerce, OpenCart, and Magento.
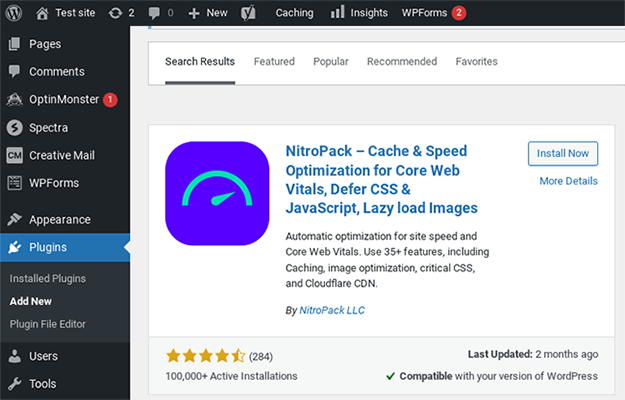
To connect it to a WordPress site, you’ll need to install and activate the NitroPack plugin, which you can do from your WP dashboard. Just navigate to Plugins > Add New, and then search for NitroPack.
Once you’ve activated it, connect it to your NitroPack account by entering your login credentials on the Settings page.

Now, NitroPack should be ready to start optimizing your site.
You can control the configuration from both inside your WP dashboard or from your account area on the NitroPack website. Let’s take a look at some of these configuration options.
Cache warmup
One of the first configuration options you’ll notice inside your NitroPack dashboard is Cache Warmup.
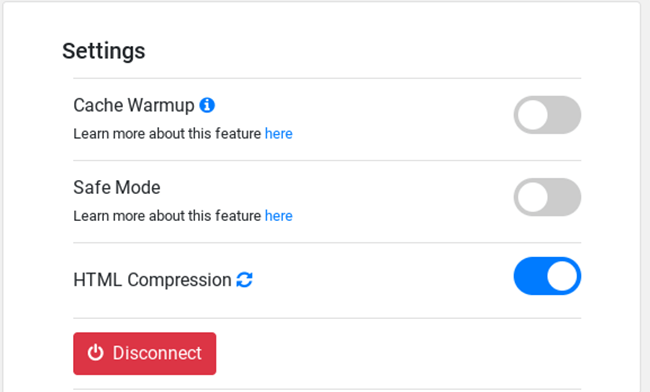
You can turn it on and off by shifting the toggle switch to the left or the right.
Once Cache Warmup is turned on, NitroPack will run an initial warmup optimization of all the pages linked on your homepage and cache the page content on your site for faster loading.
Then, it’ll schedule new optimizations for pages automatically after they’ve been purged or invalidated (i.e. whenever you update your website pages or publish new posts).
Optimization mode
The other main configuration setting you’ll notice is Optimization Mode.
This is how you tell NitroPack what your preferred ‘level’ of optimization is.

For example, Standard mode will just deploy a basic set of optimization, like CDN and lossless image compression. But it won’t bother with more advanced optimizations like font definition modification and image lazy loading.
On the other end of the scale, Ludicrous mode will do everything possible to achieve the fastest possible speeds.
No matter what mode you choose, you should see significant speed improvements (this is what we found in our speed tests). However, we’d nonetheless recommend setting the mode to Strong or above to see the biggest performance gains.
Caching & minification
If you want more control over your NitroPack configuration, you’ll need to log in to the web app and click Settings (you can’t access advanced configuration options from inside WordPress).
From here, you can create custom settings by turning individual features off and on. Let’s start by looking at the Caching settings.
By default, NitroPack will implement both page and browser caching on your site, which means it’ll store copies of your website files/content temporarily on your server and on the visitor’s computer so that they can be more quickly delivered to the end user. The result is faster page loading times.
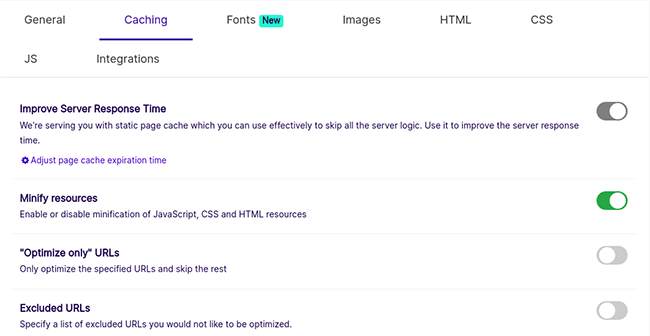
Under the Caching tab on the Settings page, you can change how it works. For example, you can tell NitroPack to only cache specific URLs, rather than your whole site.
You can also enable/disable compression and minification of JS, CSS, and HTML resources from the same tab. Minifying code reduces page weight and again leads to faster performance.
To make more advanced changes to your code minification settings, you can switch over to the HTML, CSS, or JS tabs.
Image optimization
From Settings > Images, you can change NitroPack’s image optimization settings.
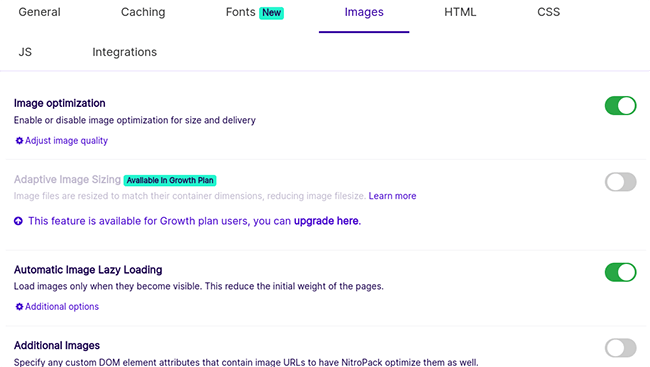
By default, image optimization should already be turned on.
When it is, NitroPack will automatically compress all images on your site to reduce their file size (using lossy or lossless compression), so that your pages load faster. It can also convert them to the lightning-fast WEBP format.
If you’re on the Growth plan, you also get adaptive image sizing, which resizes your images to match their container dimensions when you upload them to your library.
You can also turn Lazy Loading on/off here. This makes it so that images are only loaded when they become visible as the user scrolls down the page. This means no images below the fold are loaded when the user first opens the site, which boosts initial loading times.
CDN
The CDN is something you can’t configure manually on NitroPack—it’s just part of the package.
CDN stands for content delivery network. It speeds up your site by caching static resources on a globally-distributed network of servers that are spread all over the world.
Whenever someone visits your site, the content is sent to their computer from the nearest server to their physical location.
And this helps speed up loading times because physical proximity matters. If your main server is based in the US, and someone loads up your site from India, the data has to travel a long way to get there. But if it’s already cached on a server in India, it’ll arrive much quicker. See how that works?
Integrations
Under Settings > Integrations on the web app, you can synchronize NitroPack with your other plugin caches for maximum performance.
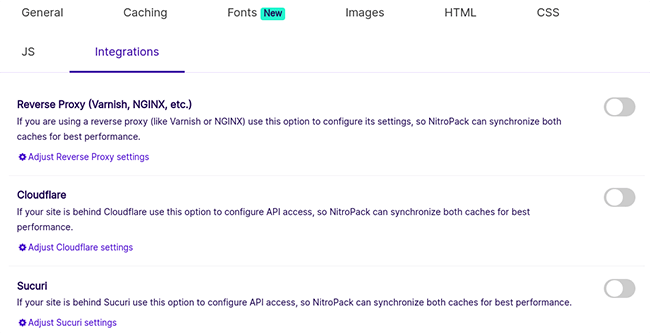
It integrates with Cloudflare, Sucuri, and Reverse Proxy (like Varnish or NGINX)
How much does NitroPack cost?
NitroPack offers four pricing plans: Free, Business, Growth, and Scale.
The Free plan won’t cost you anything and comes with all the main features, but it only includes 1GB of CDN bandwidth, and you can only use it for 5,000 page views. After that, you’ll need to upgrade to a paid plan. Free users also have a NitroPack badge on their site.
The Business plan starts from $17.50/month and comes with everything on Free, but higher usage limits. It’s capped at 25 GB/month in CDN bandwidth and 50,000 monthly page views, which makes it a good choice for low-traffic sites.
The Growth plan starts from $42.50/month and comes with much higher usage limits. You get 100 GB/month of CDN bandwidth and it’s suitable for sites with up to 200,000 monthly page views. Growth users get access to all the same features as those on the Business plan plus Adaptive Image Sizing.
The Scale plan starts from $146.67/month. It’s the top-tier plan and is good for up to 500 GB of CDN bandwidth a month, and up to 1 million monthly page views. It comes with everything on Growth plus the Font Subsetting feature.
Plans come with a 14-day money-back guarantee. Custom plans are available on request.
NitroPack pros and cons
After testing NitroPack out, here’s what we think its biggest pros and cons are.
NitroPack pros
- Improves site performance significantly. In our tests, NitroPack boosted site speed dramatically. It literally shaved seconds off of the fully loaded time right out of the box.
- Ease of use. The best thing about NitroPack is how easy it is to configure. All you really have to do is install it and choose your preferred optimization strength. There’s no need to mess around with all the advanced configurations, but if you want to, you still have the option.
- All-in-one optimizations. NitroPack does the job of multiple optimization tools. It deploys a CDN, implements caching, optimizes your images, compresses and minifies code, etc. That makes it incredible value for money.
- High-quality support. NitroPack’s large knowledge base makes it easy to find help when you need it. And if you need more hands-on assistance, you can reach out to their excellent support team.
NitroPack cons
- Doesn’t support every CMS natively. NitroPack is great if your site is built on WordPress or Magento. But unfortunately, it doesn’t integrate with Shopify or Squarespace just yet. There is an API available, however.
- Not ideal for Javascript-heavy sites. NitroPack can run into issues on sites that are very JS-heavy. In that case, it might be worth hiring a performance expert/developer to rewrite/refactor your code in combination with NitroPack.
NitroPack alternatives
Not convinced that NitroPack is the right solution for you? Here are some alternatives to check out instead.
WP Rocket
WP Rocket is one of the most popular WordPress speed optimization plugins on the market and a great alternative to NitroPack for WP users.
Like NitroPack, it aims to be an all-in-one solution and offers lots of optimization features, including page caching, browser caching, GZIP compression, delayed JS execution, CSS minification, and lazy load.
Bunny.net
Bunny.net is a global content delivery network (CDN) provider.
Aside from its powerful CDN edge storage, it can also roll out common performance optimizations on your site at the click of a button.
Sucuri
Sucuri is an all-in-one website security and performance solution.
Not only does it help to boost your site performance through its CDN and optimization features, but it also helps protect you from malicious attacks thanks to its automatic malware detection and removal and its cloud-based firewall.
Final thoughts on NitroPack
That concludes our in-depth NitroPack review.
After trying NitroPack out extensively, I’m convinced it’s the best website optimization solution on the market right now.
Its USP is how easy it is to set up. You don’t need to mess around with the configuration to get it to work right. It just works right out of the box.
In one click, it’ll optimize every aspect of your site from HTML and CSS minification to image optimization, and everything in between. That makes it perfect for beginners who aren’t super tech-savvy and want a straightforward, hassle-free solution.
And the results speak for themselves. In our tests, it boosted website performance across the board and shaved seconds off the page loading time.
But don’t take our word for it. You can test NitroPack out for yourself with their Free plan. Just click the button below to sign up.
Disclosure: If you buy through links on our site, we may make a commission. This helps to support the running of Startup Bonsai.